

Selling a motorhome in the UK can feel complicated, especially when you’re trying to get the...

Adding a second leisure battery to your motorhome is one of the most effective upgrades you can make to improve your off grid capabilities. It effectively doubles your available power, allowing for longer trips without needing to plug into the mains or run your engine. Whether you want to run the fridge overnight, keep the heating on through a cold snap, or simply charge your devices without worrying about running flat, a larger battery bank is the answer.
However, the process involves more than simply connecting two batteries together with a bit of wire. Doing it incorrectly can lead to poor performance, damaged batteries, and in the worst case, a serious fire risk. This guide is designed to walk you through the entire process with clear, accurate information, covering the essential theory, the correct components, and a step by step process to ensure your new battery bank operates safely and efficiently for years to come.
Understanding parallel connections
When you add a second leisure battery, the goal is to increase your total amp hour (Ah) capacity while maintaining a 12 volt system. To achieve this, the batteries must be connected in parallel. This means connecting the positive terminal of the first battery to the positive terminal of the second, and the negative terminal of the first to the negative terminal of the second. This configuration sums the capacities of the individual batteries, so two 110Ah batteries wired in parallel create a single battery bank with a 220Ah capacity at 12V.
It is critically important that the two batteries are as closely matched as possible. They should be the same brand, model, capacity, and chemistry. Both AGM, both Gel, or both lithium. Most importantly, they should be the same age. Mixing an old battery with a new one will result in the older, weaker battery dragging down the performance of the new one, leading to a shorter lifespan for both. For this reason, it is always recommended to install two brand new, identical batteries at the same time, even if your existing battery still seems to be working fine.
Why cross diagonal connections matter
One of the most commonly overlooked details in a parallel battery setup is how you connect the loads and charging sources to the bank. Many people simply connect everything to the nearest battery terminal, which creates an imbalance. The battery closest to the connections does more work, charges and discharges faster, and ages more quickly than the other.
The correct method is to use cross diagonal connections. This means taking the main positive feed to your 12V system from the positive terminal of Battery 1, and the main negative feed from the negative terminal of Battery 2. By doing this, the current has to flow through both batteries equally, ensuring they charge and discharge at the same rate and age together. This is a small detail that makes a significant difference to the long term health of your battery bank, and it is the method recommended by virtually every reputable battery manufacturer.
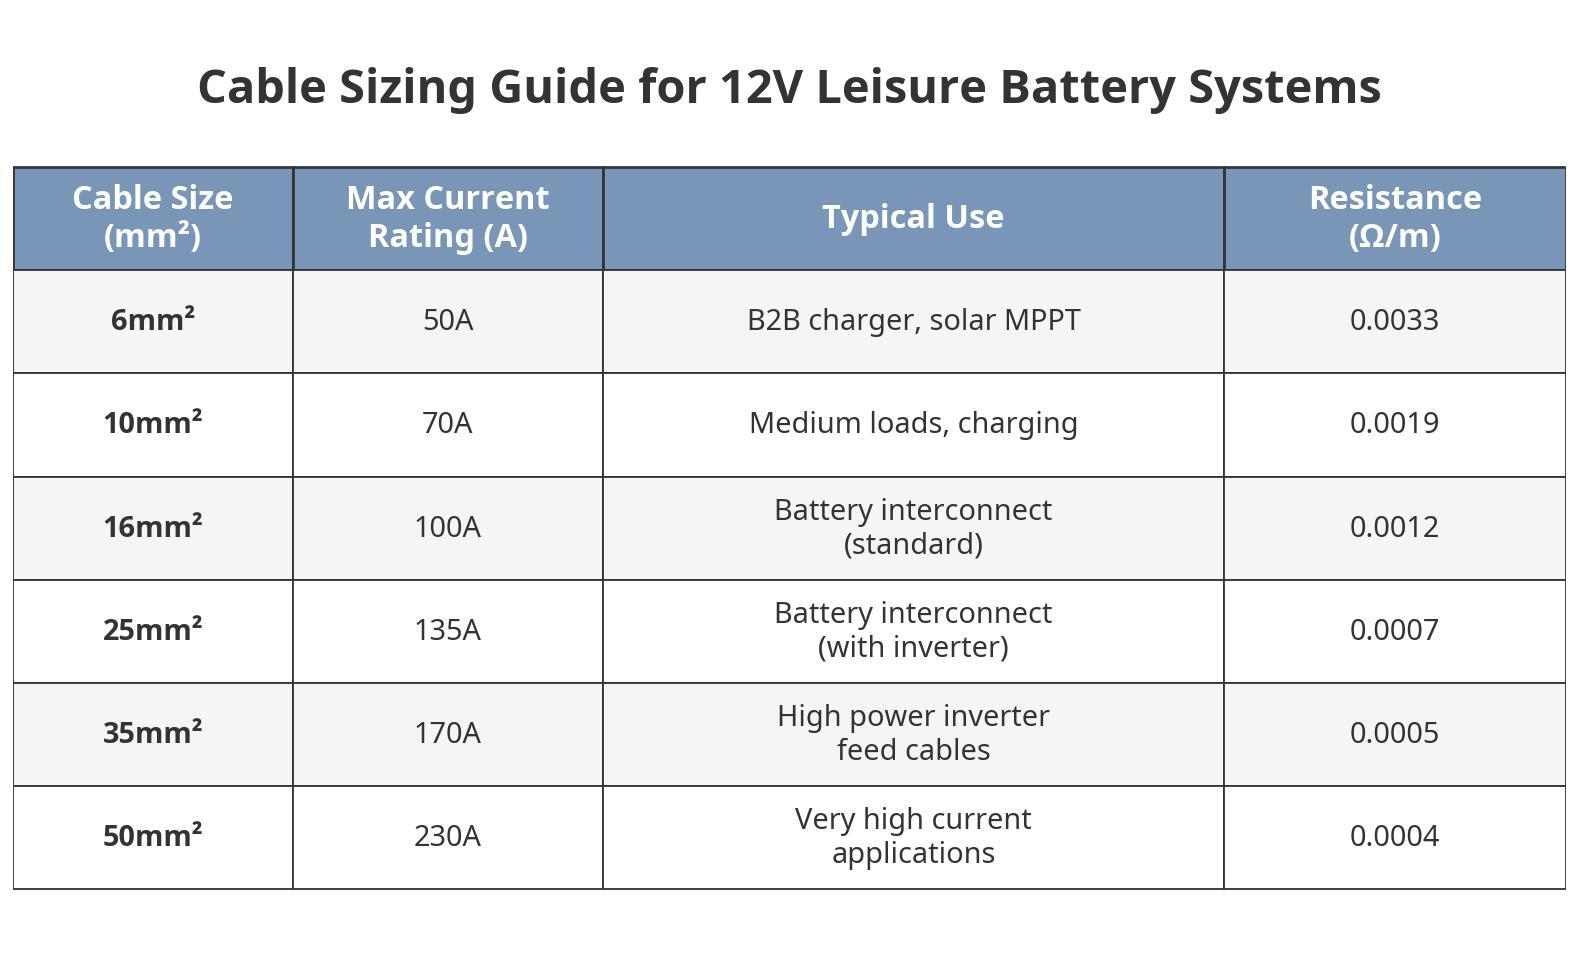
Cable sizing: getting it right
The cables that link your two batteries and connect them to your electrical system are just as important as the batteries themselves. Using undersized cables is a common and dangerous mistake. A cable that is too small for the current it needs to carry will heat up, causing voltage drop that reduces performance and, in extreme cases, can melt the insulation and start a fire. The interconnecting cables between the two batteries will need to carry the full charging and discharging current, which can be substantial if you have a powerful inverter.
For the interconnecting cables between the two batteries, a minimum size of 16mm² is recommended for most standard setups. However, if you plan to run a high power inverter of 1000W or more, it is wise to upgrade to 25mm² or even 35mm² cable to handle the high current draw safely. These interconnecting cables must be of equal length to ensure the batteries discharge and recharge at the same rate. Even if the batteries are sitting right next to each other, do not be tempted to use one short cable and one long one. Cut them to the same length, every time. The table below provides a quick reference guide for common cable sizes and their applications in a 12V leisure battery system.
Understanding voltage drop
Voltage drop is the silent enemy of any 12V system. Because we are working at low voltages, even a small amount of resistance in the cables can cause a noticeable reduction in the voltage reaching your appliances. The generally accepted maximum voltage drop for a 12V DC circuit is around 3%. Any more than that and you will start to see reduced performance from your devices, dimmer lights, and slower charging.
Voltage drop is calculated using the formula V = I x R, where V is the voltage drop, I is the current in amps, and R is the total resistance of the cable run. The resistance depends on the cable's cross sectional area and its length. For example, a 5 metre run of 6mm² cable carrying 40A would produce a voltage drop of around 0.66V, which is 5.5% and far too high. The same run in 16mm² cable would drop only about 0.24V, or 2%, which is well within acceptable limits. The lesson here is straightforward: if in doubt, go up a cable size. It costs a few pounds more but eliminates the risk entirely.
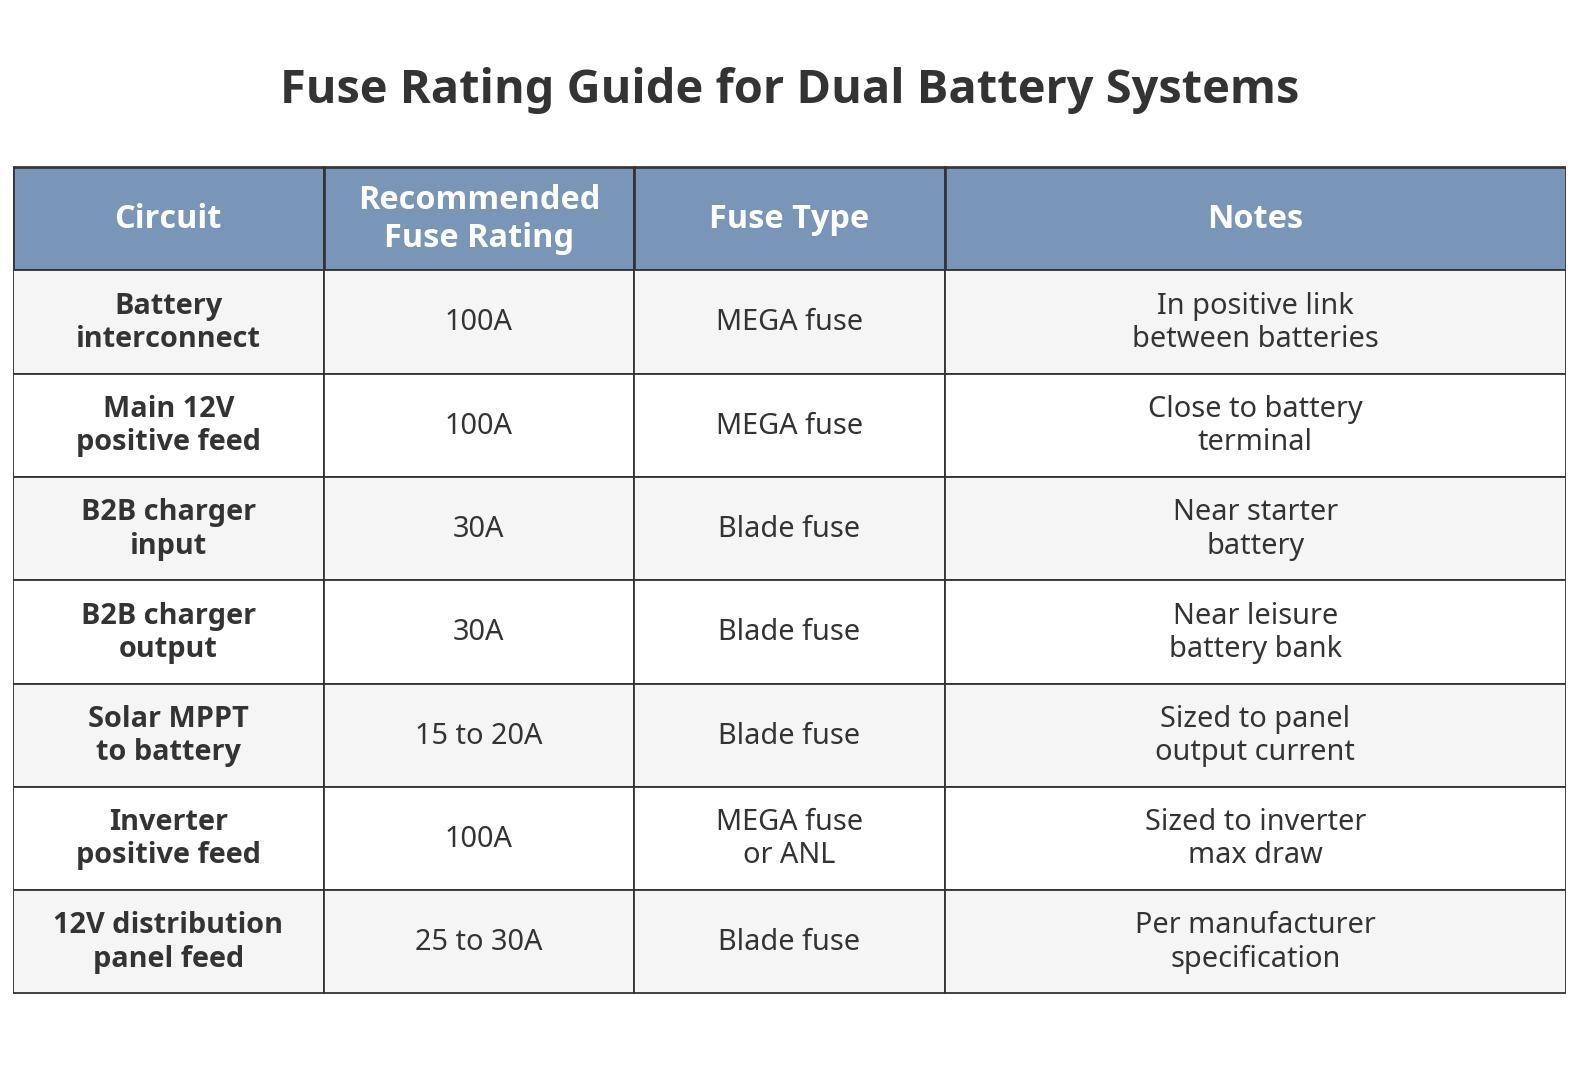
Fuse ratings: protecting your investment
Fuses are a non negotiable safety device designed to protect the wiring and your motorhome from catastrophic failure in the event of a short circuit. Every positive cable connected to your battery bank must be fused as close to the battery terminal as possible. The fuse protects the cable, not the appliance. If a cable is accidentally damaged and shorts to the chassis, the fuse will blow and break the circuit before the cable can overheat and catch fire.
For the main positive cable linking the two batteries, a high current MEGA fuse is required. A rating of 100A is generally suitable for a typical two battery setup with a standard habitation load and a moderate inverter. If the batteries are located a significant distance apart, it is best practice to install a fuse at each end of the long positive interconnecting cable. Every other circuit drawing power from your battery bank must also have its own appropriately rated fuse. The table below provides a comprehensive guide to the recommended fuse ratings for each part of a dual battery system.

Charging: split charge relays vs B2B chargers
Charging your new, larger battery bank from the vehicle's alternator requires careful consideration, especially in modern motorhomes. Older vehicles use a simple voltage sensitive relay (VSR) that connects the leisure battery to the starter battery once the engine is running and the alternator is producing a charge. This system is straightforward and effective for vehicles with traditional alternators that produce a constant voltage of around 14.4V.
However, almost all motorhomes built on a Euro 6 or newer chassis are equipped with smart alternators. These are designed to save fuel by reducing the alternator's output voltage once the starter battery is full, sometimes dropping as low as 12.4V. This voltage is insufficient to fully charge a leisure battery, meaning a simple VSR will not work effectively. For these vehicles, a Battery to Battery (B2B) charger, also known as a DC to DC charger, is essential. Popular options include the Victron Orion range and the Sterling Power Pro Batt Ultra. A B2B charger takes the variable voltage from the smart alternator, boosts it, and provides a stable, multi stage charging profile perfectly optimised for your leisure batteries. If your motorhome was built after roughly 2015 and uses a Fiat Ducato, Ford Transit, or similar Euro 6 base vehicle, a B2B charger is almost certainly what you need.
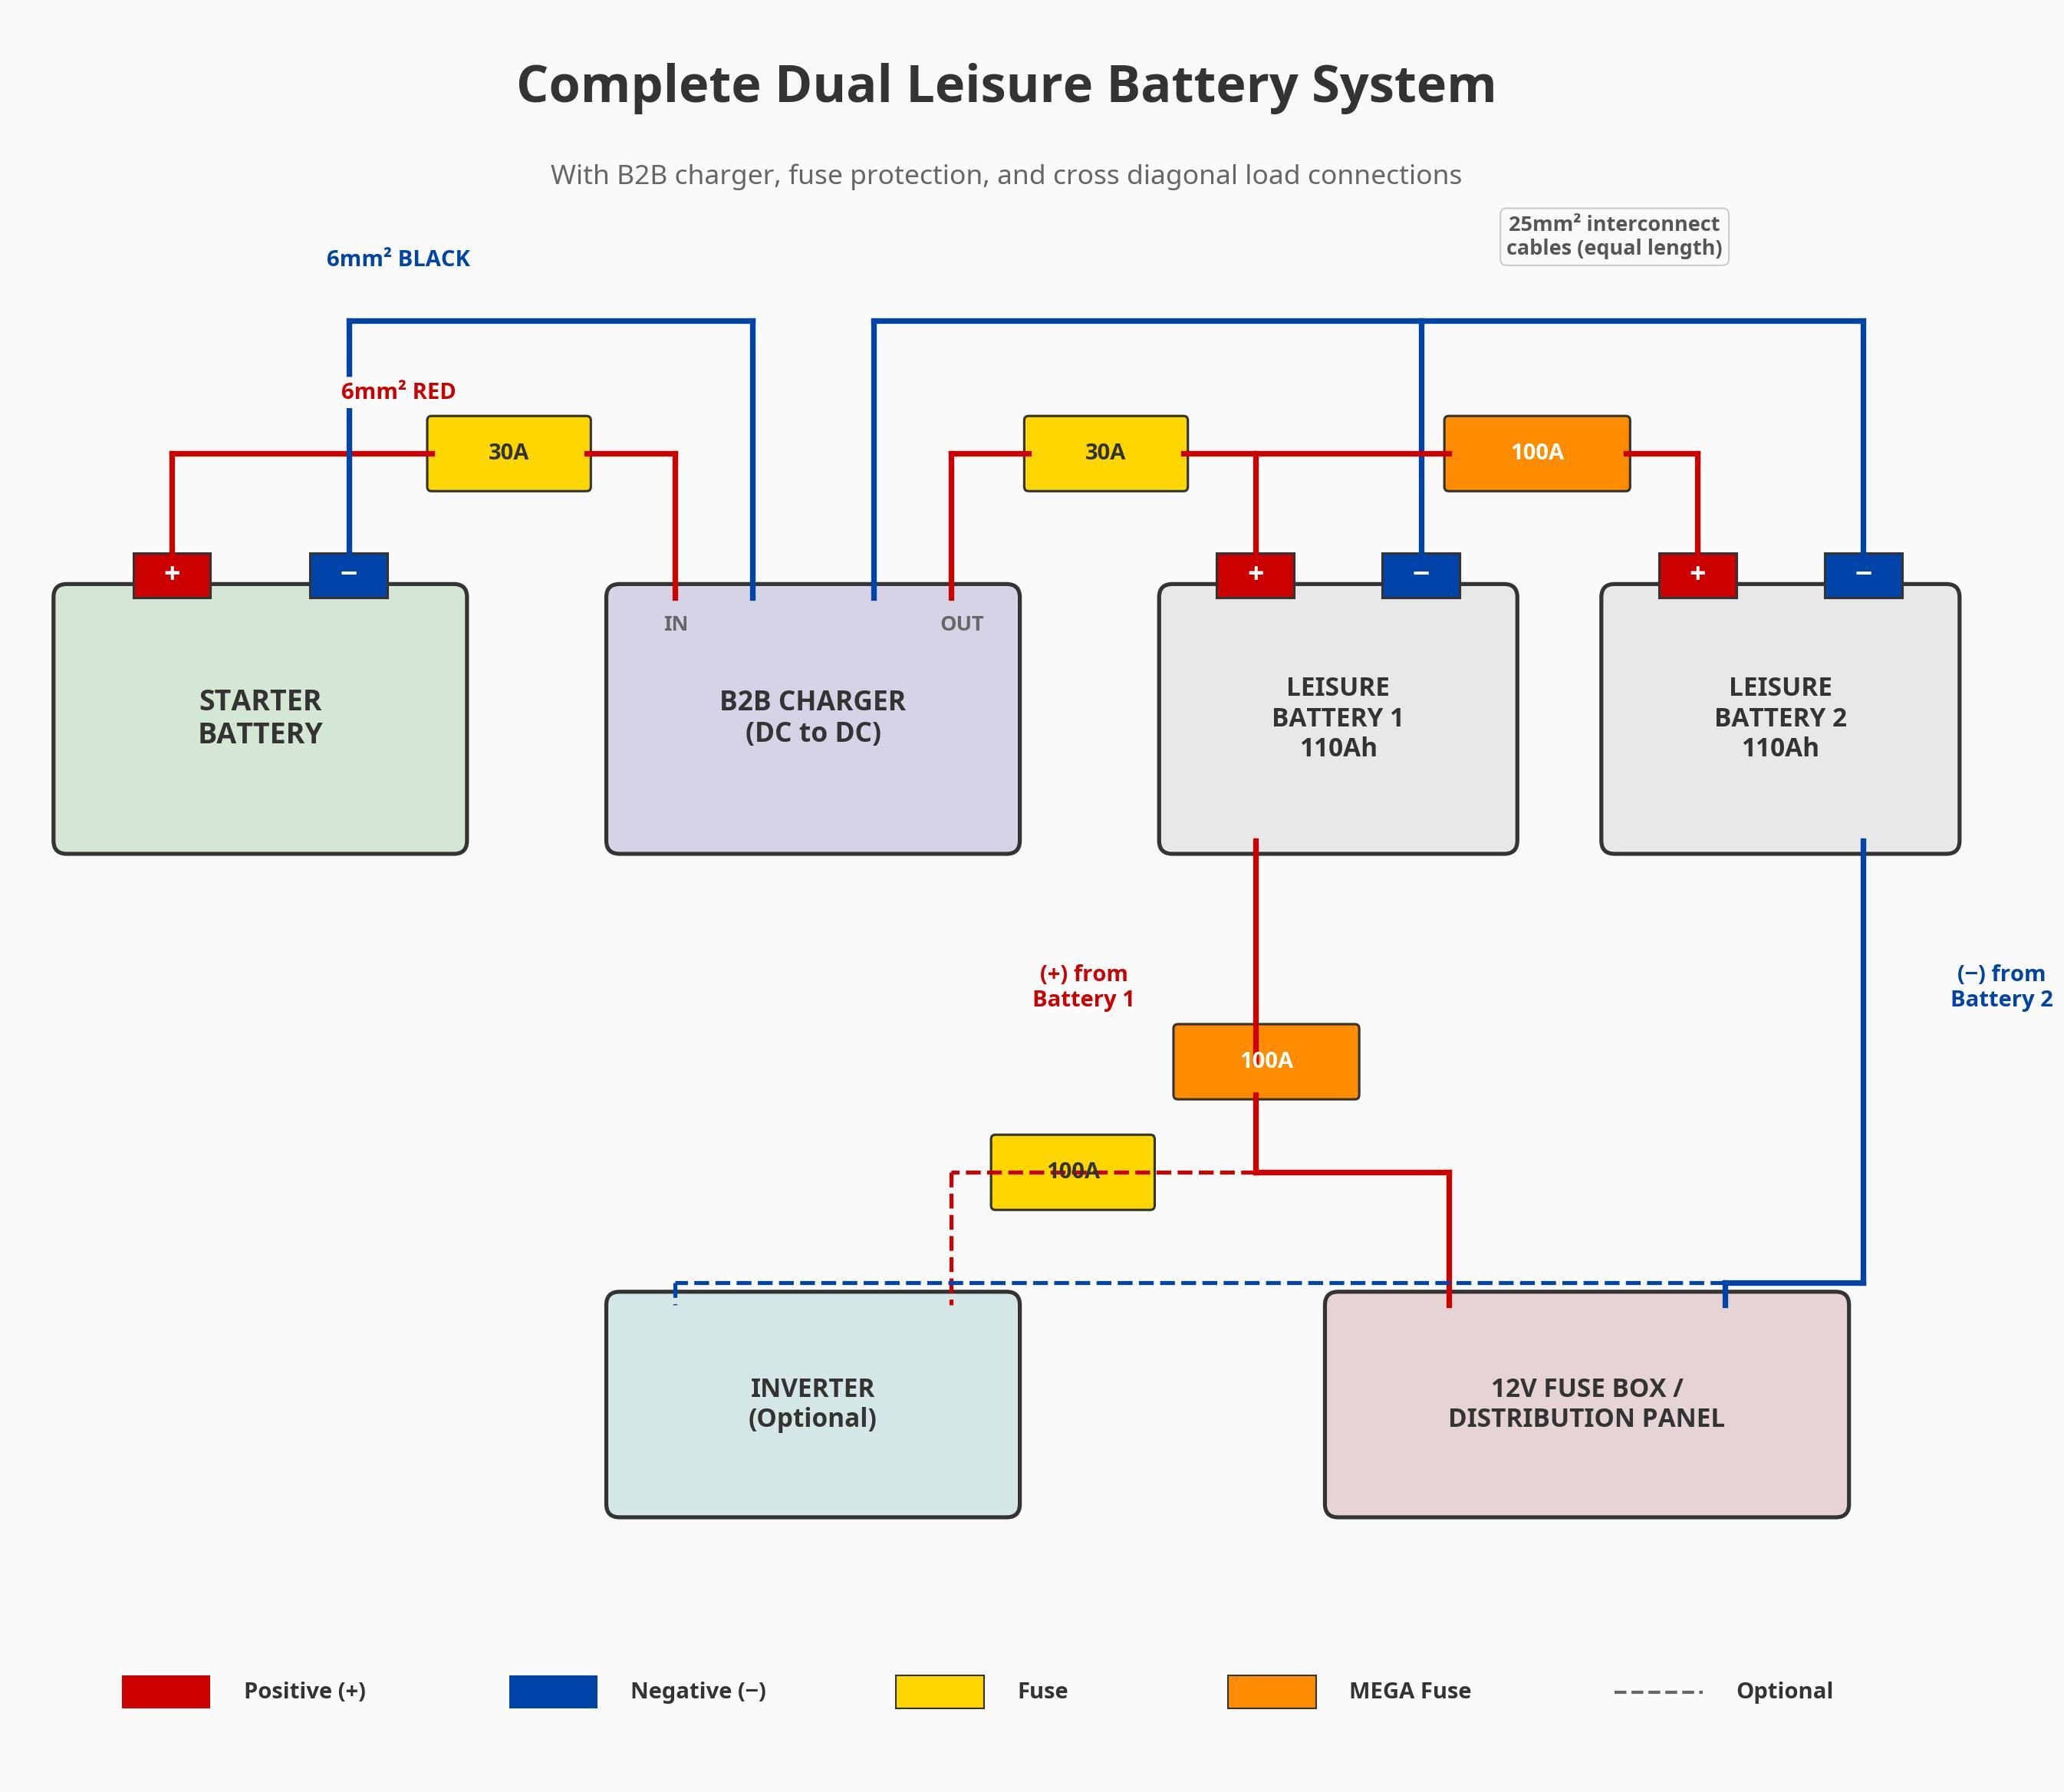
Wiring diagrams
The first diagram below shows the basic parallel connection between two leisure batteries, including the 100A MEGA fuse in the positive interconnect and the cross diagonal load connections. The second diagram shows a complete system layout, including the starter battery, B2B charger, fuse protection at every stage, and the connection to the 12V distribution panel and an optional inverter.

What you will need
Before you begin, gather all the necessary tools and components. You will need two identical leisure batteries, battery interconnect cables in 16mm² or 25mm² (cut to equal length), main power cables sized for your total system load, a MEGA fuse holder and 100A MEGA fuse, additional blade fuses and holders for other circuits, a hydraulic crimping tool for large gauge cables, a ratchet and socket set, wire cutters and strippers, adhesive lined heat shrink tubing, a heat gun, battery terminal clamps, cable ties and mounting bases, and a battery tray or secure mounting straps.
It is worth investing in a proper hydraulic crimping tool rather than trying to get away with pliers or a hammer. A poor crimp on a high current cable is a weak point that will generate heat and resistance, and it is one of the most common causes of problems in DIY installations. If you do not want to buy a crimper, many auto electrical suppliers will crimp terminals onto your cables for a small fee.
Step by step installation
Start by disconnecting the negative terminal of your vehicle's starter battery to prevent any accidental shorts. Wear safety glasses and remove any rings or watches. Batteries contain a lot of stored energy and a short circuit across the terminals can cause serious burns or even an explosion.
Position both leisure batteries securely next to each other in a well ventilated area. Use a dedicated battery tray or heavy duty straps to ensure they cannot move. A 110Ah leisure battery weighs around 25 to 30kg, and you do not want that shifting around while you are driving. If you are using lead acid batteries (AGM or Gel), ensure there is adequate ventilation around them, as they can release small amounts of hydrogen gas during charging.
Making the connections
Cut your two interconnecting cables to the exact same length, ensuring they are long enough to connect the terminals without strain but not so long that there is excessive slack. Strip the ends and use your hydraulic crimper to attach high quality copper tube terminals. Slide a piece of adhesive lined heat shrink over the cable before crimping, then shrink it down over the crimp joint with your heat gun to create a weatherproof seal.
Connect the positive terminal of Battery 1 to the positive terminal of Battery 2 using one of your prepared cables. Install the 100A MEGA fuse in this positive link, as close to one of the batteries as possible. Then connect the negative terminal of Battery 1 to the negative terminal of Battery 2 with the second cable. Now connect your motorhome's main 12V positive feed to the positive terminal of Battery 1, and the main 12V negative feed to the negative terminal of Battery 2. This is your cross diagonal connection.
Connecting the charging system
Wire in your B2B charger (or split charge relay if your vehicle has a traditional alternator) according to the manufacturer's instructions. This will typically involve running a fused cable from the starter battery positive terminal to the input of the device, and another cable from the output to the positive terminal of your leisure battery bank. Both the input and output positive cables should be fused, typically at 30A for a standard B2B charger. The negative connections from the B2B charger should go to the respective battery negatives or a common grounding point.
Once everything is connected, double check all your connections are tight and secure. Ensure all positive terminals are covered with insulating boots or tape to prevent accidental shorts. Reconnect your vehicle's starter battery. Turn on your ignition and check that the B2B charger activates and begins charging the leisure bank. Use a multimeter to verify you are seeing around 14.2 to 14.4V at the leisure battery terminals while charging. Your system is now ready to use.
A note on lithium batteries
If you are installing lithium (LiFePO4) batteries rather than AGM or Gel, the same parallel wiring principles apply, but there are some additional considerations. Most lithium leisure batteries have a built in Battery Management System (BMS) that monitors and protects the cells. When wiring two lithium batteries in parallel, it is essential that you check the manufacturer's guidance, as some brands require specific connection procedures or recommend particular fuse ratings.
Additionally, your entire charging system must be lithium compatible. This includes the B2B charger, any solar charge controller, and the mains charger. Charging a lithium battery with equipment designed for lead acid can result in overcharging, which the BMS will shut down to protect the cells, but it is not a situation you want to be relying on regularly. The good news is that most modern B2B chargers and solar controllers have a lithium charging profile built in, so it is usually just a matter of selecting the correct setting.
Common mistakes to avoid
The most frequent mistake is mixing batteries of different ages, types, or capacities. This creates an imbalance that reduces the performance and lifespan of both batteries. The second most common error is using undersized cables, particularly for the battery interconnects. If you are running an inverter, the current flowing through those cables can easily exceed 80A, and a thin cable will not cope. Always size your cables for the maximum expected current, not the average.
Another common pitfall is failing to fuse every positive cable. It only takes one unfused cable to rub through on a sharp edge and short to the chassis, and the consequences can be devastating. Finally, do not forget about ventilation. Lead acid batteries produce hydrogen gas during charging, which is flammable. Ensure your battery compartment has adequate airflow, and never install batteries in a sealed, unventilated space.
Subscribe to our newsletter and get the latest articles delivered straight to your inbox.


Selling a motorhome in the UK can feel complicated, especially when you’re trying to get the...
Choosing the right leisure battery for your motorhome is one of the most crucial decisions you will...
Modern motorhomes are heavy, complex vehicles that rely on increasingly sophisticated diesel...